3D Architectural Rendering Illustration
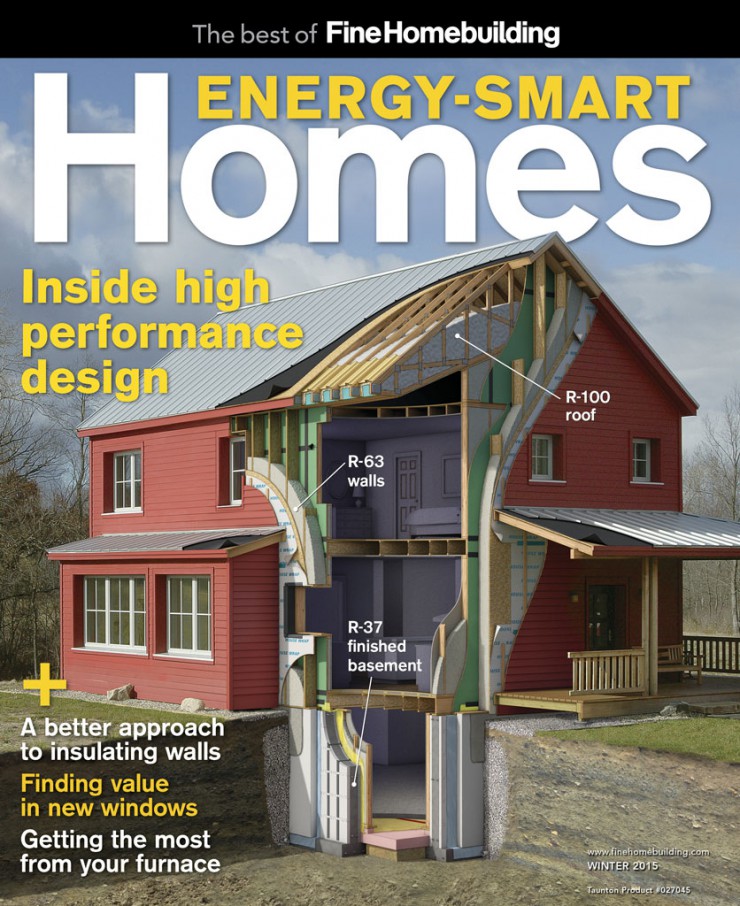
I created this 3D architectural rendering for an article in Fine Homebuilding’s “Houses 2014 Awards Issue”. The illustration was also purposed as the cover art for ” The best of “Fine Homebuilding Energy-Smart Homes“. The illustration assignment brief was to create an accurate and realistic rendering of a newly constructed highly insulated home. The art directors wanted the artwork to clearly show the multiple layers of insulation as well as the various construction materials used in the building of this Passive House. The architectural illustration was to blend seamlessly into the photograph provided.
Start the Illustration by Learning How the House is Built
As additional reference I was given photos of the construction process taken by the builder and a PDF of the architects plans. I printed the plans full size so I could use an architect’s scale ruler to get accurate measurements. These plans were very detailed and I spent a great deal of time comparing them with the construction photos in order to gain a clear idea of how the house was constructed. I did a number of sketches of wall cross sections in order to lock down how the framing, sheet goods, insulation and fabrics were arranged.
Developing the Design With Sketches Using Photoshop and The Wacom Cintiq
Once I had a good idea of how the walls worked, I started roughly sketching over the photo to develop ideas on how to best show the details of the wall construction and plan where the major cuts would be. I used Photoshop and the Wacom Cintiq for these sketches and took full advantage of Photoshop’s layers and masks. Doing a good job of designing an illustration means paying attention the how it will fit into the page layout. I encourage the art directors I work with to provide a PDF of the layout so I can see the illustration in the layout and make adjustments as the work progresses. Creating the sketches revealed a few problem areas that would require deviating from reality. For one, the basement would need to be shallower than originally built in order to fit the page layout. In addition I would need to leave out the window in the kitchen to gain a clear view of the wall structure on the right.
Once I received approval of my rough sketches from the art director I built a SketchUp model. Using SketchUp’s photo match tool the model could be seen from the same vantage point and the perspective would match the photo precisely. As I developed the SketchUp model I rendered line drawings and placed them in a layer in the Photoshop PSD file. Working back and forth between modeling with SketchUp and drawing in Photoshop I developed a tight line drawing and submitted it the art director for review. Once I received approval I proceeded to rendering the final illustration.
Integrating 3D Digital Rendering with Hand Drawing and Painting
There were several challenges in the final rendering. The colors of the materials needed to be accurate and the lighting needed to match the photo. SketchUp was simply not up to this level of realism so I turned to Cinema 4D to render the overall lighting as well as the color and textures of the materials. Even though Cinema 4D can create amazing renders I always plan on hand rendering many of the details within Photoshop. Its simply too time consuming to setup materials like the gravel near the foundation and the soil textures in the foreground. The wood grain, plastic sheeting and some of the tape were added by hand as well. The cutaway soil was created using various photos of cut soil and were stamped in and color matches as needed. The cast shadow on the cutaway soil was added using a layer set to multiply. This part of the process is similar to how cinema matte painters work.
If you would like to learn more about my illustration process please visit my illustration tutorial pages.
